

Turning Milk into Mozzarella: A Kitchen Alchemists Guide to Mastering the Curd
- Cara Russell Buckner

- Oct 11, 2024
- 7 min read

If you'd like to see the cheese-making process in action, I've created a series of videos on my Instagram and TikTok accounts. You can also check them out below!
If you're here, that means you're different from other people. You know, those people who buy cheese from the store. It's so much easier to just place that beautiful bar of mozzarella or extra sharp cheddar in your shopping cart. And let's be honest, it's cheaper too! But, that's not stopping you, because you're different. You want to bite into a slice of cheese that you made yourself. As your friendly amateur food alchemist, I'm here to help.
I'll admit first off that making homemade mozzarella can be a bit of a challenging endeavor. But for the amateur food alchemists among us, it's an opportunity to don our apron (lab coat) and get to experimenting in our kitchen (laboratory). If the food experiment is a success, we end up with a lovely ball of cheese and the satisfying feeling of accomplishment gained when one crafts something with their own hands. And if the result is a failed food experiment, there may be a few explicit words tossed around, but after the frustration is gone, the determined alchemist now has the opportunity to salvage our experiment in a creative way. And unless you've managed to burn the homemade mozzarella, it is probably still salvageable, or at least edible.
Now, let's begin. This is the recipe I follow every time I start cooking, gathering all my ingredients in the biggest pot I have. I will also explain the scientific processes involved and offer some useful tips I've learned through experimentation. As food prices continue to rise, I will also suggest creative ways to use your homemade mozzarella, whether it turns out perfectly or not.
What is Mozzarella?
Mozzarella is a mild, soft cheese that originates from southern Italy. It has a slightly sweet taste and a stretchy texture. Mozzarella can be eaten fresh in dishes like caprese. It also melts well and is popular on pizza, in a grilled cheese sandwich, and much more. Mozzarella was originally made from the milk of the Italian water buffalo, brought to Italy in the 7th century by the Arabs. This is a great example of how every culture influences others. These days, mozzarella is mostly made with cow's milk, which is more available and affordable than buffalo milk.
The Key Three Ingredients: Milk + Rennet + Acid
The combination of Milk, Rennet, and Acid is crucial in the cheese-making process. Milk provides the base for the cheese, Rennet helps coagulate the milk proteins, and Acid aids in the separation of curds and whey, resulting in the formation of cheese.

Milk
The first essential component is high-quality milk, which serves as the base for the cheese-making process. The milk's richness and quality greatly influence the final taste and texture of the mozzarella.
Mozzarella's creamy texture and stretchiness come from its protein structure, specifically casein, which is a complete protein found in mammal milk. Cow's milk is 80% casein protein, while human milk is 40%.
When the milk is heated and ingredients like citric acid and rennet are added, the milk coagulates, forming cheese curds. The curds are then heated, stretched, shaped, and ultimately cooled and refrigerated.
Disclaimer: This article contains affiliate links. If you make any purchases from
using these links I may earn a small comission at no cost to you.
What Kind of Milk to Use
We can assume that most people don't have access to Italian water buffalo milk. So what kind of milk should you use to make mozzarella? You can make mozzarella from cow's milk, buffalo milk (which gives the rich and creamy buffalo mozzarella), sheep's milk, and even goat's milk. Each type has its own unique flavor profile. The milk you choose to use completely affects the outcome of your mozzarella. The lower the fat in the milk, the drier and less flavorful your cheese will be when it's finished. Fresh milk that you can source from a local farm or co-op will create a cheese that is rich, creamy, and a little sweet.
DO NOT USE UHT MILK: Do not make mozzarella from UHT milk, which stands for Ultra-High Temperature. To extend the shelf life of milk, UHT milk is heated to 284 degrees F (135 degrees C). Even though it stays at that temperature for only a few seconds, the heat kills all of the important microorganisms in the raw milk. UHT milk doesn’t have to be refrigerated before opening, and due to this process, it can last for months if kept unopened.

What is Rennet?
Lastly, rennet is added to further aid in curd formation and coagulation. Rennet contains enzymes that play a vital role in transforming the liquid milk into solid curds, which are then shaped and molded into the familiar round balls of fresh mozzarella. These three ingredients work in harmony, each contributing to the unique characteristics that define this classic cheese.
Rennet is a complex of enzymes used in cheese production to coagulate milk into curds and whey. It can be extracted from calves' stomach lining or produced from microbial or vegetable sources, suitable for vegetarian and vegan diets. The main enzyme in rennet, chymosin, causes milk proteins to coagulate, forming a solid curd. Adding rennet to milk triggers chemical reactions that produce curds, which are then processed to make various cheeses with different textures and flavors. Rennet is a crucial step in cheese production, influencing characteristics like texture, taste, and meltability. Alternative rennet sources have expanded options for producers to meet diverse dietary preferences, while traditional animal-derived rennet is still used in some processes.

Acid
In the alchemical process of making mozzarella cheese, acid plays a crucial role in transforming milk into curds and whey, which are the building blocks of cheese. The acidification process helps to lower the pH of the milk, causing the proteins to coagulate and form curds. There are several options you can use to achieve this:
Fresh Lemon Juice: This natural acid is readily available and adds a subtle citrus flavor to the cheese. It’s a great option for those who prefer using fresh ingredients.
Vinegar: A common household item, vinegar is effective in curdling milk quickly. It has a more pronounced taste, which can slightly influence the flavor of the mozzarella. Distilled white vinegar is the best household vinegar to use. It has a neutral flavor, which won’t affect the taste of the cheese, and its acidity level is consistent, which is important for curd formation. Other types of vinegar, like apple cider or balsamic, may add unwanted flavors or have varying acidity levels that could interfere with the cheese-making process.
Citric Acid: Often used in cheese making, citric acid is a powdered form of acid that provides consistent results. It is easy to measure and control, making it ideal for those who want precision in their cheese-making process.
Each of these acids can be used to create homemade mozzarella, allowing you to experiment and find the perfect balance for your culinary experiments.

Supplies You'll Need
Large Mixing Spoon
Long Knife
Cheese Cloth optional
CHEESE MAKING KIT: If you want to purchase everything in a kit, try out Cultures For Health. They gifted me their mozzarella making kit a few years ago. While I found the recipe to be overly detailed and a little messy, it is a good place to begin. The kit provides you with pretty much everything except the pot, strainer and milk.

Ingredients You'll Need
1 gallon of whole milk. For best results use fresh raw milk. Do Not Use UHT
1/4 tablet (1/8 tsp liquid) of rennet
1 & 1/4 tsp citric acid, or 1/4 cup distilled white vinegar or fresh lemon juice
1 1/4 cups of water
Salt to taste
Step-by-Step Recipe
1. Dissolve Citric Acid: Begin by dissolving the citric acid in 1 cup of water. Or 1/4 cup distilled white vinegar or fresh lemon juice.
2. Heat the Milk: In a large pot, add the milk and the dissolved citric acid. Heat it slowly, being cautious not to let it boil, until it reaches around 90°F (Fahrenheit) or 32°C (Celsius). If you want to be old school, dip your finger into the milk. It should be hot but not too hot that it burns. You can also look for small bubbling along the edge of the pot.

3. Prepare Rennet: While the milk is warming up, dissolve the 1/4 tablet of rennet in 1/4 cup of water.

4. Add Rennet: Once the milk has reached the desired temperature, remove it from the heat and gently add the dissolved rennet. Stir for about 30 seconds for even distribution.

5. Let It Rest: Cover the pot with a lid and allow the mixture to sit for 5-10 minutes. During this time, curds will begin to form.

NO WHEY! When you remove the lid, you should find that the milk has transformed into a semi-solid mass called curd, and there will be a yellowish liquid called whey. This curd is the basis of your mozzarella. Whey is the liquid that separates from the curd during the cheese-making process. It's rich in proteins, vitamins, and minerals. So, don’t toss it out! You can cook with it, or just drink it straight! Today, we’re going to use it for the next step of the mozzarella process.

6. Cut the Curd: Using a knife that can reach the bottom of the pot, cut the curd into cubes.

7. Gently Stir: Gently stir the curds to help release any trapped whey.

8. Heat and Mix the Curds: Place the pot back on the stove, heating the curds to 110°F, all the while gently stirring. Once you've reached the target temperature, remove the pot from the heat.


9. Strain the Curds: Using a strainer, separate the curds from the whey, gently pressing out the whey.


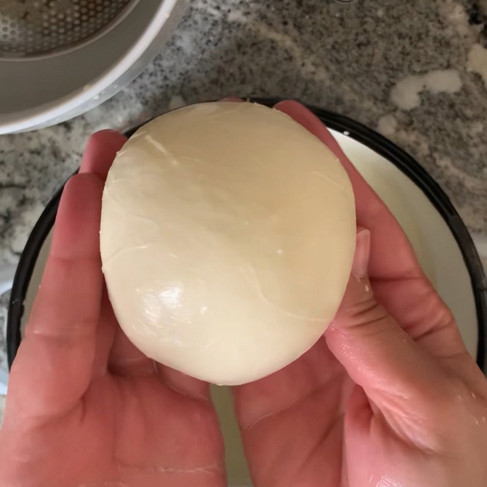
10. Stretch and Shape: Heat the pot of whey to 165°F and place the curd ball into the hot whey for 10-20 seconds at a time. You can also create smaller pieces as you desire. Gently stretch the cheese and shape it to your liking.


11. Add Salt: You can add salt during the stretching phase by adding it to the whey, or sprinkle it on top at the end, or throughout the stretching, or according to your preference.


12. Chill and Store: Place the shaped mozzarella into cold whey or water, and store it in the fridge until you're ready to use it in your favorite dishes...if it makes it that long before getting EATEN!


Now, as you embark on your mozzarella-making journey, keep in mind that practice makes perfect. Don't be discouraged if your first attempts yield slightly rubbery or even gritty results; it happens to the best of us. With each batch, you'll gain a better understanding of the alchemy of cheesemaking. So, embrace the experimentation process, and soon you'll be enjoying your very own homemade mozzarella cheese. Until next time, my Amateur Food Alchemists!

Comments